There's a special kind of magic in biting into a freshly made cannolo: the satisfying crunch of a crisp, bubbly shell giving way to a cloud of sweet, creamy ricotta filling. While often associated with professional Italian bakeries, the truth is, making homemade cannoli is an incredibly rewarding experience that's well within reach for the home cook. This comprehensive guide will walk you through every step, transforming what might seem like a daunting task into a delightful culinary adventure. Forget settling for anything less than perfection; with this authentic recipe, you'll master both the delicate shells and the luscious ricotta cream, creating a true taste of Sicily in your own kitchen.
Crafting cannoli from scratch is indeed a labor of love, requiring a little patience and attention to detail. However, the unparalleled flavor and texture of truly authentic homemade cannoli make every moment spent worthwhile. We'll demystify the process, offering practical tips and techniques to ensure your shells are perfectly crisp and your filling is exquisitely smooth and sweet. Get ready to impress your family and friends with a dessert that truly sings with Italian tradition.
The Art of Perfect Cannoli Shells: Achieving Irresistible Crispness
The foundation of any great cannolo is its shell – light, airy, and wonderfully crisp. Getting this right is key to an authentic experience. While it might seem intimidating, creating cannoli dough from scratch is surprisingly similar to making a pie crust, especially when utilizing modern kitchen tools to streamline the process.
Crafting the Dough: Speed and Precision
To begin, gather your dry ingredients: all-purpose flour, a pinch of ground cinnamon (a traditional touch that adds subtle warmth), unsweetened cocoa powder (giving the shells their signature hue and depth), sugar, and a dash of salt. Combine these in a food processor – your secret weapon for quick, consistent dough. Next, add cold, cubed unsalted butter. The key here is cold butter; it creates pockets of steam during frying, resulting in those desired bubbles and flakiness. Pulse the mixture 6 to 8 times until the butter pieces are roughly the size of large breadcrumbs. Avoid over-processing; you want visible butter chunks, not a smooth paste.
Now for the wet ingredients: a splash of fresh lemon juice and cold white wine. The acid in both helps tenderize the dough and contributes to the crispness. White wine is traditional, adding a subtle flavor and aiding in the dough's elasticity. Pulse briefly after each addition until the dough just barely begins to come together. You'll know it's ready when you can pinch a small amount between your fingers and it holds its shape. Turn the dough out onto a lightly floured surface and knead it gently for a minute or two until it's smooth. Wrap it tightly in plastic wrap and allow it to rest in the refrigerator for at least an hour. This resting period is crucial; it allows the gluten to relax, making the dough easier to roll and preventing shrinkage during frying.
Rolling to Perfection: Thin is In
Once rested, your dough is ready to be transformed. While rolling by hand is possible, achieving the ideal thinness can be challenging. Many experienced bakers, including myself, find that running the dough through a pasta maker is a game-changer. It ensures a consistently thin sheet, crucial for those iconic bubbles and a truly crisp texture. Dough that's too thick won't bubble properly and will result in a dense, chewy shell rather than a delicate one. Start on the widest setting and gradually work your way down to the thinnest or second-thinnest setting, dusting lightly with flour if needed to prevent sticking.
Forming and Frying: The Golden Touch
As you roll out your dough, begin heating your frying oil. Choose a heavy-bottomed pot and fill it with either vegetable oil, canola oil, or shortening, ensuring there's enough depth to submerge the cannoli molds. Heat the oil to precisely 380°F (193°C). A deep-fry thermometer is essential here; maintaining a consistent temperature is critical for perfectly cooked shells – too low and they'll be greasy, too high and they'll burn before cooking through.
While the oil heats, cut your thin dough into rounds using a cookie cutter slightly smaller than your cannoli tubes. These specialized metal tubes are indispensable for shaping the shells. Wrap each dough round around a cannoli mold, ensuring a slight overlap. Just before completely wrapping, brush one edge with a little egg wash (a whisked egg with a splash of water) then finish wrapping and press firmly to seal the seam. This prevents the dough from unravelling in the hot oil. Using a pair of tongs, carefully submerge the molds into the hot oil. Fry for about a minute, or until the shells are a deep golden brown and beautifully bubbly. Remove them from the oil and place them on a paper towel-lined wire rack to drain and cool. Once cool enough to handle, gently slide the tubes out of the shells and allow the shells to cool completely on the wire rack. Repeat with the remaining dough, being mindful of your oil temperature.
Mastering the Ricotta Cream Filling: Sweet & Silky Perfection
With your crisp shells cooling, it's time to turn our attention to the heart of the cannolo: the luscious, sweet ricotta cream. This filling is deceptively simple, yet it requires a crucial preliminary step to achieve that authentic, non-runny consistency.
The Ricotta Dilemma & The Solution: Draining for Deliciousness
The secret to a truly perfect cannoli cream lies in the ricotta cheese. Authentic Italian ricotta, especially from Sicily, is much drier and firmer than what you typically find in most grocery stores. Store-bought ricotta in North America, while delicious in its own right, often contains excess liquid that, if not removed, will result in a watery, disappointing filling. Trying to make a cannoli filling straight from the container is a recipe for a runny mess.
The solution is simple but essential: drain your ricotta. There are a few effective methods. For best results, place the ricotta in a fine-mesh sieve lined with several layers of cheesecloth. Set the sieve over a bowl and refrigerate it for at least 4-6 hours, or ideally, overnight. You'll be surprised by how much liquid collects in the bowl! For an even firmer result, after draining, you can gently press down on the ricotta to extract more moisture. Some even suggest tying up the cheesecloth into a bundle and hanging it over a bowl for a few hours. The drier your ricotta, the creamier and more stable your filling will be. This small step makes all the difference between a good cannolo and an extraordinary one. For more detailed insights, check out our guide on Easy Homemade Cannoli: Pro Tips for Crisp Shells & Creamy Filling.
Assembling the Cream: A Cloud of Sweetness
Once your ricotta is properly drained, it's time to transform it into the iconic cannoli cream. Transfer the firm, dry ricotta to a large mixing bowl. Add mascarpone cheese (this adds an incredible richness and silkiness that elevates the cream), powdered sugar (also known as confectioners' sugar, which dissolves beautifully for a smooth texture), a touch of vanilla extract, and often, a pinch of cinnamon or orange zest for brightness. Some recipes even include finely chopped candied fruit or mini chocolate chips for added texture and flavor – feel free to customize!
Using an electric mixer, beat the ingredients on medium-high speed until the mixture is light, fluffy, and perfectly smooth. Scrape down the sides of the bowl periodically to ensure everything is incorporated. Taste and adjust sweetness if desired. Cover the bowl and refrigerate the filling for at least 30 minutes to allow the flavors to meld and the cream to firm up slightly. This chill time makes it easier to pipe and ensures a more stable filling.
Tips for Success: Elevating Your Homemade Cannoli Experience
Creating homemade cannoli is a journey, and a few expert tips can make all the difference, ensuring your results are consistently spectacular.
- Cold Ingredients for Shells: Always use very cold butter and liquids when making the dough. This creates steam during frying, leading to those signature bubbles and a flaky texture.
- Don't Overwork the Dough: Gentle kneading is key. Overworking the dough can develop too much gluten, resulting in tough shells.
- Invest in a Pasta Maker: While optional, a pasta maker is invaluable for achieving uniformly thin dough, which is crucial for truly crisp and bubbly shells.
- Oil Temperature is Paramount: Use a reliable deep-fry thermometer and maintain the oil temperature at a consistent 380°F (193°C). Fluctuations can lead to greasy or burnt shells.
- Drain Ricotta Thoroughly: This cannot be stressed enough. The drier your ricotta, the less likely your filling is to become watery and seep into the shells, making them soggy.
- Chill Your Filling: A well-chilled filling is easier to pipe and holds its shape better. It also allows flavors to deepen.
- Fill Just Before Serving: This is arguably the most important tip. To maintain the crispness of your shells, fill them no more than an hour before serving. For optimal texture, fill them moments before they are devoured.
- Piping Bag Perfection: For a professional finish and cleaner filling, use a piping bag fitted with a wide round or star tip to fill your shells.
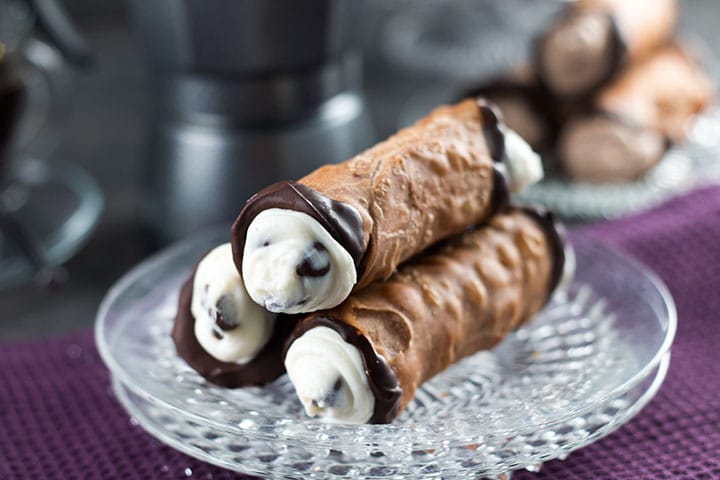
- Garnish with Flair: Dusting with powdered sugar is classic. You can also dip the ends in chopped pistachios, mini chocolate chips, or candied orange peel for added visual appeal and flavor.
- Storage: Store unfilled shells in an airtight container at room temperature for several days. Store the cream filling separately in an airtight container in the refrigerator for up to 3 days.
By following these expert suggestions, your homemade cannoli will not only taste incredible but will also stand as a testament to your newfound skill in Italian pastry making.
Conclusion: The Sweet Reward of Handmade Tradition
Making cannoli from scratch is an endeavor that transcends mere cooking; it's an embrace of culinary tradition, a celebration of flavor, and ultimately, an incredibly rewarding experience. From the careful crafting of the crisp, bubbly shells to the meticulous preparation of the rich, sweet ricotta cream, every step contributes to a masterpiece that's far superior to anything store-bought. This homemade cannoli a complete guide has provided you with all the knowledge and tips you need to confidently tackle this iconic Italian dessert.
While it requires a little time and patience, the pure joy of sharing and savoring your own handmade cannoli—with their perfect contrast of textures and harmonious blend of sweet and subtle flavors—is truly unparalleled. So, gather your ingredients, clear your schedule, and embark on this delicious journey. Your taste buds (and your lucky guests) will thank you for bringing a piece of Sicilian magic into your home.
