Embrace the Art of Homemade Cannoli: Your Authentic Sicilian Journey
Few desserts evoke the rich culinary traditions of Italy quite like the cannoli. With its irresistibly crisp shell and luscious, creamy filling, this iconic Sicilian pastry is a true masterpiece. While a trip to an Italian bakery might satisfy a craving, there's an unparalleled satisfaction in creating these delights from scratch in your own kitchen. This isn't just a recipe; it's a comprehensive journey, providing you with a complete guide to making homemade cannoli that rival those found on the sun-drenched streets of Sicily. Making homemade cannoli is indeed a labor of love, a beautiful culinary project that rewards your efforts with an end result that is truly spectacular. Forget any apprehension you might have had; we’re about to break down the process into manageable, enjoyable steps, offering insights and tips to make your cannoli-making experience smoother and more successful than ever before. Prepare to impress yourself and your loved ones with an authentic taste of Italy.Crafting the Perfect Cannoli Shells: Crispy, Bubbled Perfection
The foundation of any great cannoli is its shell – a delicate, fried pastry that shatters with every bite, creating a delightful contrast to the smooth filling. Achieving this characteristic crispness and the slight bubbling requires attention to detail, but with the right techniques, it’s entirely within reach.Ingredients for the Shells:
- 2 cups (240g) all-purpose flour, plus extra for dusting
- 2 tablespoons (25g) granulated sugar
- 1 teaspoon unsweetened cocoa powder (for color and subtle depth)
- ½ teaspoon ground cinnamon
- ¼ teaspoon salt
- 3 tablespoons (42g) unsalted butter, very cold and cubed
- 1 large egg, separated (white for egg wash)
- 2 tablespoons lemon juice
- ¼ cup cold white wine (Marsala or dry white wine)
- Vegetable oil or shortening, for frying
Dough Preparation (The Quick Way):
For a quicker and easier dough, a food processor is your best friend, mimicking the simplicity of making a pie crust. Start by combining the flour, sugar, cocoa powder, cinnamon, and salt in the bowl of your food processor. Pulse a few times to ensure everything is well mixed.
Next, add the very cold, cubed butter. The cold butter is crucial for creating flaky layers. Pulse 6-8 times until the largest pieces of butter are about the size of large breadcrumbs. Avoid over-processing here; you want pea-sized bits of butter remaining.
Now, sprinkle in the lemon juice and then the cold white wine, pulsing briefly after each addition. Continue pulsing until the dough just barely begins to come together. A good test is to pinch a small amount between your fingers; if it holds its shape, it's ready. Don't let it form a single ball in the processor.
Kneading, Resting, and Rolling:
Turn the dough out onto a lightly floured surface and gently knead it for a minute or two until it forms a smooth ball. Wrap it tightly in plastic wrap and refrigerate for at least one hour, or preferably longer. This resting period allows the gluten to relax, making the dough easier to roll and ensuring a more tender shell.
When it comes to rolling, precision is key for truly crispy, bubbled shells. While it's possible to roll by hand, many home bakers find that a pasta maker yields superior results. Hand-rolled dough often ends up too thick, preventing the characteristic bubbles from forming during frying. Aim for a thinness similar to fresh pasta sheets, using the pasta maker's thinnest or second-thinnest setting. If rolling by hand, strive for an eighth of an inch or less.
Forming and Frying the Shells:
Heat your frying oil (vegetable oil or shortening) in a large, heavy-bottomed pot to 380°F (193°C). A heavy pot helps maintain a consistent temperature. Meanwhile, prepare your dough by cutting it into 3-4 inch rounds using a cookie cutter. The size should be slightly smaller than your cannoli tubes.
Lightly brush one edge of each dough round with the reserved egg white – this will act as your "glue." Wrap the dough around a metal cannoli tube, pressing the egg-washed edge firmly to seal it securely. This ensures the dough won't unravel during frying.
Carefully lower 2-3 prepared tubes into the hot oil, using tongs to hold them steady initially. Fry for about 1 minute, or until they are golden brown and beautifully crisp, with visible bubbles on the surface. Remove them from the oil and place them on a paper towel-lined plate to drain excess oil. Once cool enough to handle, gently slide the shells off the metal tubes and place them on a wire rack to cool completely. Repeat with the remaining dough.
Mastering the Silky-Smooth Cannoli Cream: The Heart of the Dessert
The filling is where the cannoli truly comes alive. A classic Sicilian cannoli filling is famously made with fresh ricotta cheese, but achieving the right consistency with store-bought ricotta requires a crucial preparatory step.Ingredients for the Filling:
- 2 lbs (900g) whole milk ricotta cheese
- 1 cup (200g) mascarpone cheese, softened
- 1 ½ cups (180g) powdered sugar, sifted
- 1 teaspoon vanilla extract
- Optional: ⅓ cup mini chocolate chips, chopped candied fruit, chopped pistachios, or orange zest for mixing into the filling.
The Essential Ricotta Drainage Step:
This is perhaps the most critical step for a perfect cannoli filling. Store-bought ricotta often contains excess liquid, which will result in a runny, disappointing cream. To prevent this, you must drain the ricotta. Place the ricotta in a fine-mesh sieve lined with cheesecloth (or a clean kitchen towel) over a bowl. Refrigerate for at least 4-6 hours, or ideally, overnight. The longer it drains, the thicker and creamier your filling will be.
Once drained, discard the liquid. You'll be left with a much firmer, drier ricotta that's ready for transformation into luscious cream. For more expert advice on achieving that perfect balance of crisp shells and creamy filling, check out our guide on Easy Homemade Cannoli: Pro Tips for Crisp Shells & Creamy Filling.
Mixing the Cream:
In a large bowl, combine the drained ricotta cheese, softened mascarpone, sifted powdered sugar, and vanilla extract. Beat with an electric mixer on medium-low speed until smooth and well combined. Be careful not to overmix, as this can make the mascarpone too thin. If adding optional mix-ins like chocolate chips or candied fruit, gently fold them in by hand.
Cover the bowl and refrigerate the cannoli cream for at least 30 minutes to allow the flavors to meld and the mixture to firm up slightly. This makes it easier to pipe and ensures a richer taste.
Assembling and Serving Your Sicilian Masterpiece
The moment of truth! Assembling your cannoli is quick and easy, but timing is important to ensure the shells remain wonderfully crisp.Piping and Garnishing:
Transfer the chilled cannoli cream to a piping bag fitted with a wide round or star tip (or simply snip off the end of the bag). Take your cooled cannoli shells and pipe the filling into each one, starting from one end and piping towards the center, then repeating from the other end. This ensures an even, full filling. Don't pipe until just before serving, as the moisture from the filling will soften the shells over time.
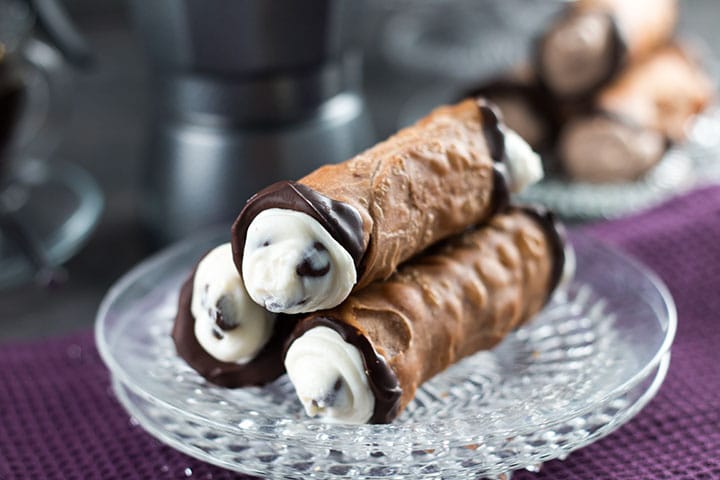
Once filled, it’s time for the final flourishes. Dust your homemade cannoli generously with powdered sugar. For an authentic touch, dip the ends of the filled cannoli into chopped pistachios, mini chocolate chips, or finely diced candied orange peel. These garnishes not only add visual appeal but also extra layers of flavor and texture.
Storage Tips:
Unfilled cannoli shells can be stored in an airtight container at room temperature for up to 3-4 days. The cream can be stored separately in an airtight container in the refrigerator for up to 2-3 days. Always fill the cannoli shells just before serving to maintain their signature crispness. Leftover filled cannoli will still taste delicious, but the shells will inevitably soften after a few hours.
Dive deeper into making every component from scratch with our comprehensive article, Cannoli From Scratch: How to Make Perfect Shells & Ricotta Cream, for even more detailed insights.
