Easy Homemade Cannoli: Pro Tips for Crisp Shells & Creamy Filling
Embarking on the journey of making homemade cannoli is a delightful culinary adventure, promising a dessert far superior to anything you'd find in a bakery. This isn't just a recipe; it's a complete guide designed to demystify the process, transforming what might seem like a daunting task into an enjoyable and rewarding experience. Imagine biting into a perfectly crisp, bubbling shell yielding to a rich, velvety sweet ricotta and mascarpone filling – that's the magic of true homemade cannoli. While it’s a labor of love that can’t be whipped up in a flash, the techniques and pro tips outlined here will streamline your efforts, ensuring every cannoli you create is a masterpiece of texture and flavor. So, roll up your sleeves; we're about to dive into crafting authentic homemade cannoli shells and filling from scratch.The Art of Crafting Perfect Cannoli Shells
The foundation of an exceptional cannoli lies in its shell. Achieving that signature crispness and delicate bubble requires attention to detail, but with the right approach, you'll be frying flawless shells in no time.Dough Mastery: From Processor to Perfection
The secret to a quick and consistent cannoli dough begins with a food processor, mirroring the ease of making a perfect pie crust.- Combine Dry Ingredients: Start by whisking together your all-purpose flour, a touch of granulated sugar for sweetness, a pinch of salt to balance flavors, and crucially, cinnamon and unsweetened cocoa powder. The cocoa adds a subtle depth of flavor and a beautiful traditional hue, while cinnamon provides that classic aromatic warmth.
- Incorporate Cold Butter: Next, add small cubes of very cold unsalted butter to the dry mixture. Pulse the food processor 6 to 8 times until the butter pieces are about the size of large breadcrumbs. Keeping the butter cold is essential for creating flaky, tender shells, as it prevents the butter from fully integrating into the flour too early.
- Add Wet Ingredients: Gradually sprinkle in fresh lemon juice and cold white wine. The lemon juice brightens the flavor and helps tenderize the dough, while the white wine contributes to the dough's crispness and a subtle, distinctive flavor profile. Pulse with each addition until the dough just barely begins to hold together. You'll know it's ready when you can pinch a small amount between your fingers, and it holds its shape.
- Knead and Rest: Turn the dough out onto a lightly floured surface and knead it gently for just a minute or two until it forms a smooth ball. Over-kneading can develop too much gluten, resulting in tough shells. Wrap the dough tightly in plastic wrap and refrigerate it for at least one hour – preferably longer. This resting period is crucial; it allows the gluten to relax, making the dough much easier to roll thinly and preventing shrinkage during frying.
Achieving the Ideal Thinness
For those coveted crispy, bubbly shells, thinness is paramount. While rolling by hand is possible, it's often difficult to achieve the consistent thinness required.- The Pasta Maker Advantage: Here's a pro tip that makes all the difference: use a pasta maker. Attempting to roll the dough thin enough by hand often results in shells that are too thick, which won't bubble properly when fried and will lack that delicate crispness. A pasta maker allows you to achieve uniform, paper-thin sheets quickly and efficiently. Start on the widest setting and gradually pass the dough through increasingly thinner settings until it's nearly translucent.
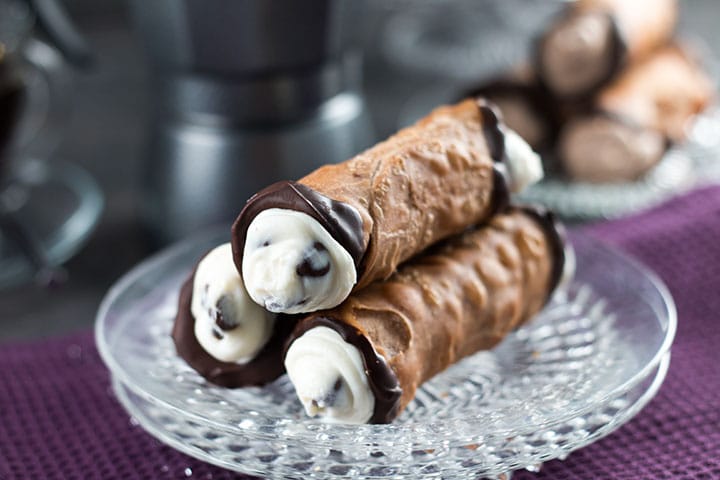
- Forming the Shells: Once your dough is rolled thin, use a round cookie cutter that's slightly smaller than your cannoli tubes to cut out circles. Lightly grease your metal cannoli tubes – this will help prevent the shells from sticking after frying. Wrap each dough circle around a tube, overlapping the edges. Just before sealing, brush one edge lightly with an egg wash (a whisked egg with a splash of water). Press the edges firmly together to create a secure seal. This step is vital to ensure the dough doesn't unravel during frying.
Frying for Flawless Crispy Shells
Frying is where the magic truly happens, transforming delicate dough into crunchy perfection.- Oil Temperature is Key: In a large, heavy-bottomed pot, heat at least 2-3 inches of shortening or your preferred vegetable oil to a precise 380°F (193°C). A deep-fry thermometer is non-negotiable here; maintaining the correct temperature is critical for even cooking and optimal crispness. If the oil is too cool, the shells will absorb too much fat and become greasy; too hot, and they'll brown too quickly without cooking through.
- Frying Technique: Using a pair of sturdy tongs, carefully submerge one or two cannoli-wrapped tubes into the hot oil. Fry them for about one minute, or until they are a beautiful golden brown and visibly bubbly. The rapid heat will cause the thin dough to blister and become incredibly crisp.
- Cooling and Removing: Once fried, lift the shells from the oil, allowing excess oil to drip back into the pot, and place them on a paper-towel-lined plate to absorb any remaining oil. As soon as they are cool enough to handle, but still warm, gently slide the crisp shells off the metal tubes. If you wait until they are completely cold, they may become brittle and break. Place the empty shells on a wire rack to cool completely before filling. For more detailed insights into authentic Sicilian shells, check out our guide on Homemade Cannoli Guide: Authentic Sicilian Shells & Filling.
Unveiling the Secret to Irresistible Cannoli Cream
While the crisp shell sets the stage, the rich, sweet, and airy filling is the true star. Getting the texture just right is paramount, and it all starts with the right cheese.The Ricotta Riddle: Draining for Dreamy Cream
The most common pitfall for aspiring cannoli makers is a runny filling, and the culprit is almost always undrained ricotta cheese. Store-bought ricotta in many regions contains a significant amount of liquid, unlike the fresh, thick ricotta used traditionally in Italy.- The Draining Imperative: This is arguably the most crucial step for a creamy, stable filling. You *must* drain your ricotta cheese thoroughly. Place the ricotta in a fine-mesh sieve lined with cheesecloth (or even a coffee filter) set over a bowl. Refrigerate it for at least 4-6 hours, or ideally, overnight. For an even drier result, after several hours, gather the cheesecloth and gently squeeze out any remaining liquid. This process removes excess whey, concentrating the flavor and ensuring your filling will be wonderfully thick and smooth, not watery.
Blending for Velvety Smoothness
Once your ricotta is perfectly drained, the assembly of the cream is straightforward.- Combine Key Ingredients: In a large bowl, combine your meticulously drained ricotta with high-quality mascarpone cheese. Mascarpone adds incredible richness and helps stabilize the filling, contributing to that luxurious, velvety mouthfeel. Add powdered sugar (also known as confectioners' sugar), which dissolves easily and prevents a grainy texture, and a splash of pure vanilla extract.
- Mix Gently: Using a spatula or a stand mixer fitted with a paddle attachment on low speed, mix the ingredients until just combined and smooth. Be careful not to overmix, as this can incorporate too much air and cause the filling to become less dense and potentially separate.
- Optional Flavor Enhancements: For an authentic touch, consider folding in a bit of finely grated orange zest for a bright, citrusy note. Mini chocolate chips, chopped pistachios, or candied fruit are also popular additions.
- Chill for Firmness: Cover the filling and refrigerate it for at least an hour. This chilling time allows the flavors to meld and the filling to firm up, making it easier to pipe. For a deeper dive into crafting the perfect ricotta cream, consult our comprehensive guide: Cannoli From Scratch: How to Make Perfect Shells & Ricotta Cream.
Assembling Your Masterpiece & Serving Tips
The moment of truth – filling your perfectly crisp shells!Fill Just Before Serving: This is a golden rule for cannoli. To preserve the delightful crispness of your homemade cannoli shells, do not fill them until just before you plan to serve them. The moisture from the ricotta cream will quickly soften the shells, compromising their texture. If preparing for a party, keep shells and filling separate until guests arrive or until you're ready to plate.
Filling Technique: The easiest and neatest way to fill cannoli is by using a pastry bag fitted with a wide, round tip. Pipe the cream into one end of the shell until it's about halfway full, then switch to the other end and pipe until the filling meets in the middle, creating a beautifully rounded, full cannoli.
Finishing Touches: Elevate your cannoli with simple yet elegant garnishes:
- Lightly dust with powdered sugar.
- Dip the ends into chopped pistachios, mini chocolate chips, or finely diced candied orange peel.
Serve immediately and watch them disappear!
Troubleshooting Common Cannoli Challenges
Even with the best recipes, sometimes things go awry. Here are solutions to common homemade cannoli dilemmas:- Shells Not Crispy or Not Bubbling: The dough was likely too thick (remedy with a pasta maker!), or your frying oil wasn't hot enough (ensure it reaches a consistent 380°F).
- Shells Unraveling During Frying: This is usually due to an insecure seal. Make sure to use enough egg wash and press the dough firmly together when wrapping it around the tube.
- Filling Too Runny: The most frequent issue! Your ricotta wasn't drained sufficiently. Next time, drain it longer, ideally overnight, and consider gently squeezing it in cheesecloth for extra dryness.
- Shells Sticking to Tubes: Ensure your metal cannoli tubes are lightly greased before wrapping the dough. Also, remove the shells from the tubes while they are still warm, not completely cold.
- Dough Too Tough to Roll: This can happen if the dough was over-kneaded (developing too much gluten) or not rested long enough in the fridge. Ensure gentle kneading and an adequate chill time.
Making homemade cannoli is an immensely satisfying endeavor. From the rich aroma of the dough to the glorious crisp of the shell and the luxurious embrace of the creamy filling, every step contributes to a truly special dessert. By following this complete guide and utilizing these pro tips, you'll master the art of homemade cannoli, impressing your family and friends with an authentic Italian treat that tastes like it came straight from a Sicilian piazza. Enjoy the process, and savor every bite!
